The Portable Darkroom

Working in the field with the Wet Collodion process provides interesting challenges, everything from the weather, temperatures and even microclimates can cause the chemicals to be fussy and not work correctly, I’ve had days and even weekends when my chemicals just didn’t want to work.

11149433_10206495642820853_8947766296724087853_n


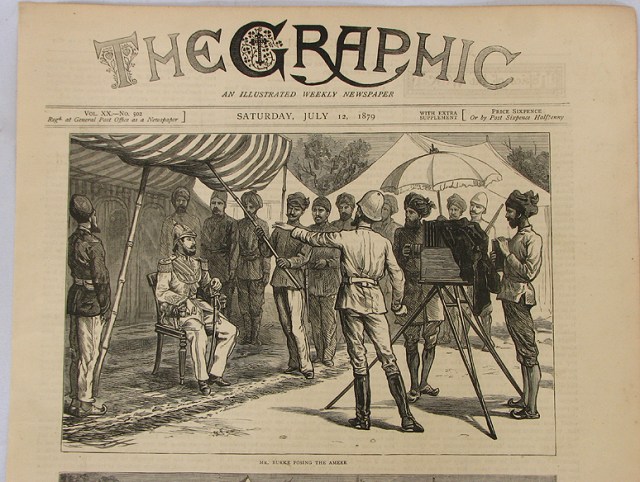
The next problem, the general public, even after explaining the process, that I need to develop or transfer the sensitized plate, to the plate holder in dark room like conditions, they ask or even mistake my portable darkroom as a camera.  This has caused me to move my dark-box to a less prominent area of my camp.

__________________

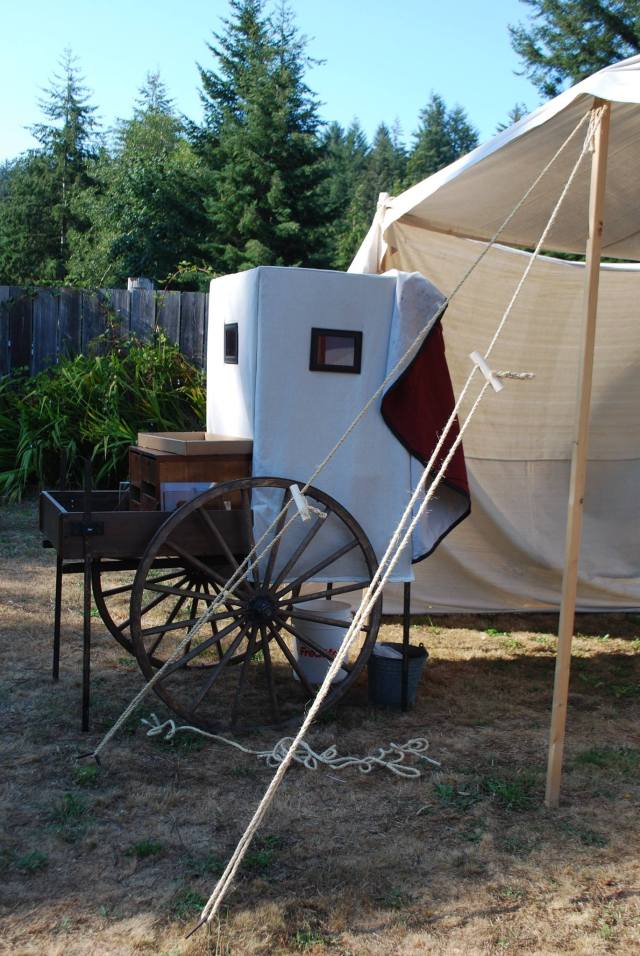
The Portable Dark Room, these came in many different designs, some were small carts, others were wagons, small tents, with others being wooden boxes of various types of configurations.

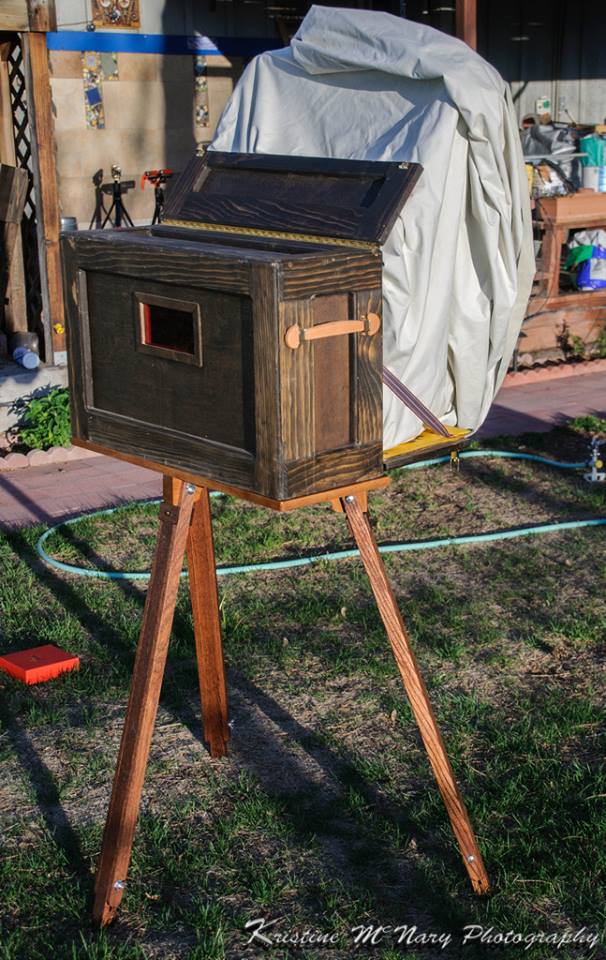
The photographer could actually purchase, what was often simply referred to as a Dark-tent, or Dark-box.  Our Dark-box has evolved, some, starting with a wooden box with a window to allow light inside.

blackarts.jpg

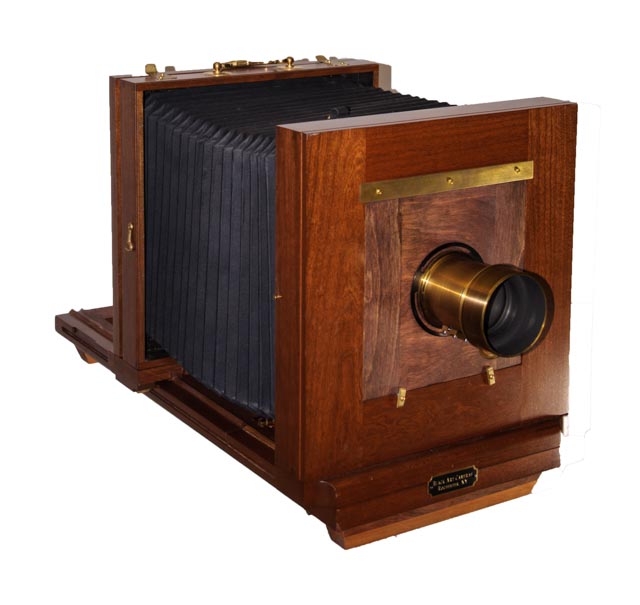
The Design was loosely designed was based upon a dark-box that is crafted by Black Art Woodcraft.
Our Design even used a similar design stand, which proved to be unstable in part because of my physical height, and a requirement to have the dark box internal work surface as a high a the counters in Julie child’s kitchen.

The Next question I do get once in a while is did you make it?  No, I didn’t make the box, at the time I didn’t have the skills. however, I did design it and finish it. My skills with regards to woodworking were limited primarily to finishing work.  so, I stained, the exterior, painted in the interior, added the handles. the shroud, and support for the shroud.

11070422_10206495643660874_3923187153167215529_o.jpg

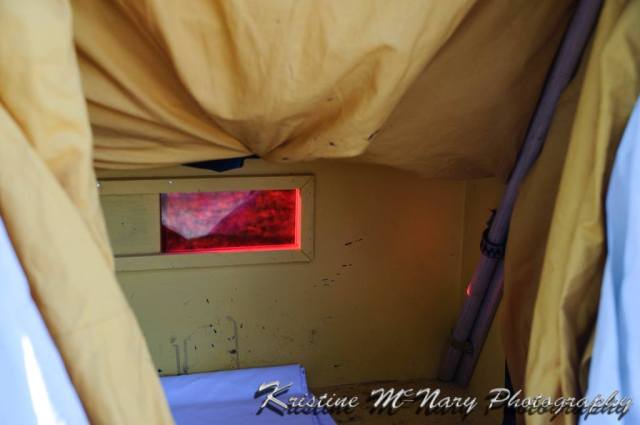
I choose the yellow, as it’s bright, allowing better visibility within the dark-box, as well as being a color that collodion film is blind too. I eventually painted my entire darkroom the same yellow.  Also, yellow was the color traditionally used within dark-boxes  H7.jpg

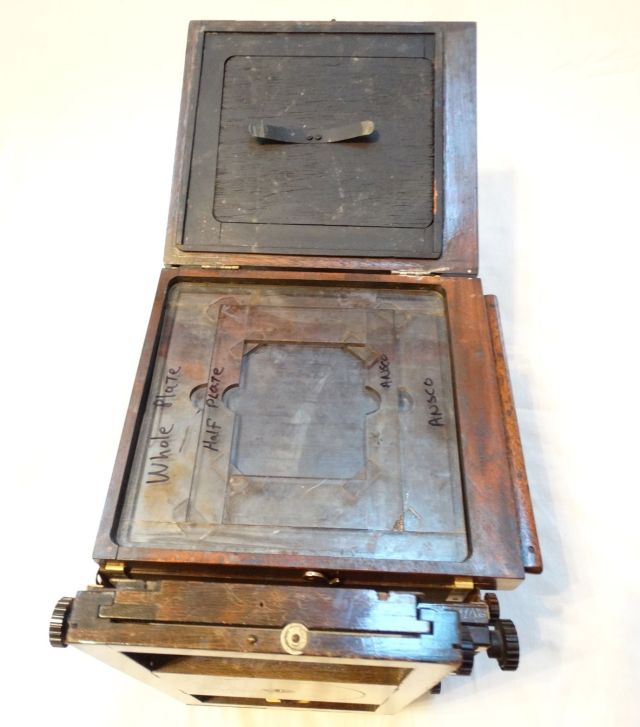
This is one of the few surviving portable dark-boxes from the 19th century, I’m not sure it was ever actually used as silver nitrate tends to eat wood, and get on everything.  Style of dark-box, I call the suitcase style, when it’s closed, it resembled a suitcase


H7-2.jpg


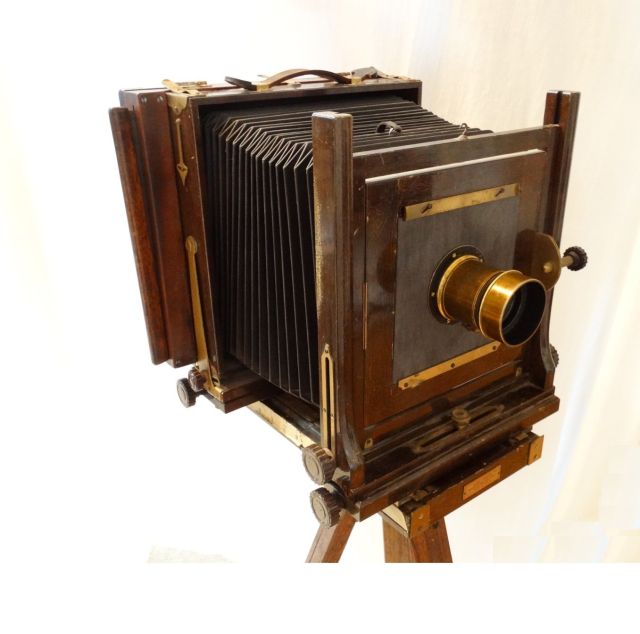
As the original stand to our Dark-box provided to be unstable, I and with a realization that many dark-boxes were supported by a tripod I began designing a new stand.  – note the dark-box in the image, it’s more of the suitcase style, but it supported by a tripod support.

JohnPowell.jpg

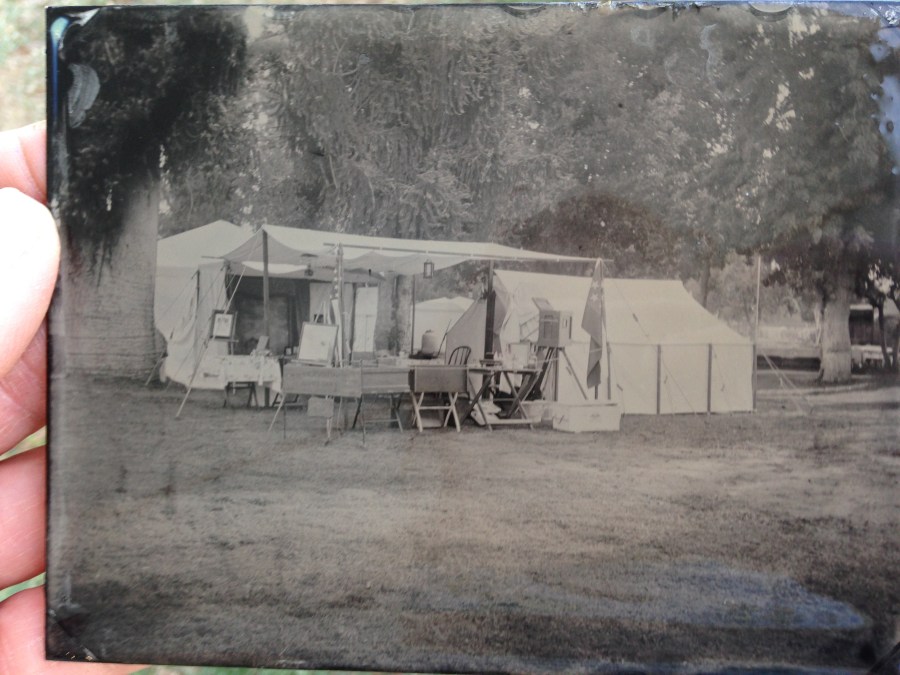
Here’s another modern dark-box designed like the suitcase style, built as I understand it by Mark Osterman and later sold to the photographer using it.  this photo was taken 20+ years ago when collodion artist where activity working at reenactments.
12307524_1091298257567720_4836360986409519638_o.jpg

Interesting note about her garb is that she’s wearing a long coat, this style coat almost seemed to be the in style for a photographer of the period working in the field that along with a basic straw hat.  Mathew Brady, Timothy O’Sullivan, and even Alexander Gardner have been photographed wearing similar coats in the field.

back to our Dark-box, the opportunity presented itself, Ty Guillory, on his page Guillory Cameras was selling plans for a platform tripod.  I purchased the plans and adapted them for use with my Dark-box, recreating the cleat design in the bottom of the tripod, then adding a conventional sized mounting bolt in the bottom of the dark box, this allows me to effectively use a single bolt to attach the dark-box to the tripod, while preventing it from twisting on the platform.

darkbox tri-pod.jpg

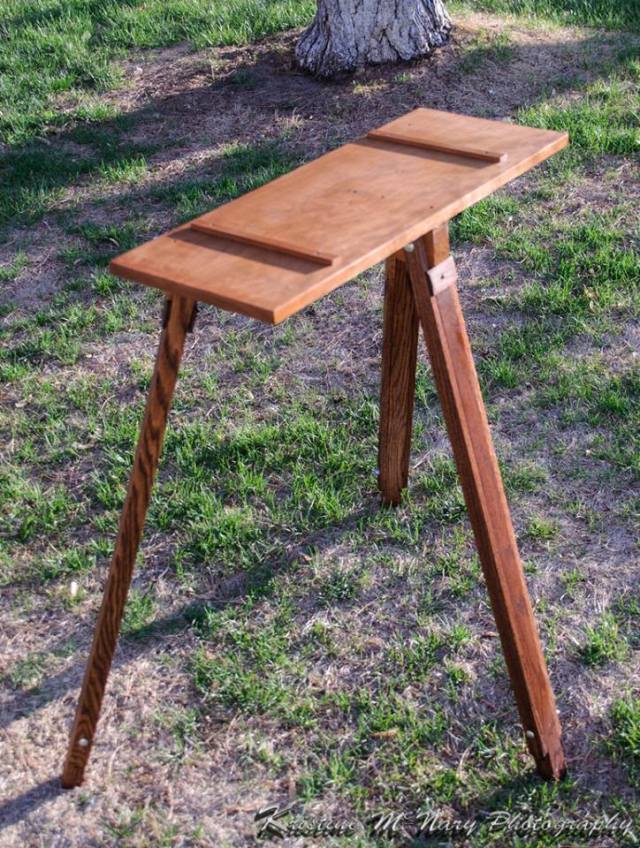
the top is made from solid cherry – a board that I fell in love with because of the grain that I found at the store specializing in hardwood, the legs are made from oak.  The next aspect was after looking at my Zone IV wood tripod, I noticed it had two sets of bolts for the lower extension of the leg, so, I simply added another set. this prevents the leg from collapsing.

So, with the exception of smooth or slippery surfaces, tripod support is extremely solid, when used in conditions where I have smooth or slippery surfaces I either drive a stake in the ground at the end of each leg, or I use anti-skid mats under each leg.

our Darkbox is ideal for the whole plate sized plates but becomes a little tight for 8×10, it’s also not particularly portable, I’m working on a couple of different design idea for more portability, and would eventually like to build or purchase a cart such as the one Barbara L. Stevenson uses. This I feel would allow me to move my camera around to different locations at events, working more as an itinerant photographer. 10535714_711931188856886_46888564588958569_o.jpg

here are some different photo’s & drawings of dark tents, boxes, carts, and wagons.


So, is the Dark Box a Camera.. no, it’s literary just a big wooden box used as my portable dark room, the only things that my dark box has in it when it’s setup is maybe a tray, some bottles, paper towels and a bunch of silver stains.  I did add a couple of strips of LED lights hidden in the top for extra lighting when using it indoors.

Civil War Reenactors camp guide

late last year, I was showing some different people, some documents that I’ve put together in a folder talking about our camp.  This folder continually grows with our camp, as we add items I tend to research the item and write a little info about it.

growing up, and having belonged to the Renaissance Military Society, we often spent time researching and in some cases documenting. Items, clothing etc. to prove the historical correctness.

tb7741

Within the greater reenacting circles, the American Civil War is considered entry level reenacting. Unfortunately, there is also a great number of people, who often take the whole hobby as a big cosplay convention that is focused on the American civil war. while giving them excuses to, go burn powder.  These people also often give the wrong impressions making those who spend a lot of time an energy, learning the history and taking the extra effort to share that history, while doing the best that they can to provide an impression that the person and their items walked out of a history book.  – our camp is no exception to that.  and frankly, I was insulted when someone referred to my camera, and items within our camp as props. Then, to add fuel to that fire, there are people within the hobby, that create drama by not understanding basic skills that most people during the mid 19th century would have a basic understanding.

Thus, I started writing documents about the everything within our camp, which includes caring for the canvas tents, setting up, tearing them down and even folding them.
I’ve made wood and canvas cots originally based on plans from a book published in 1859 called the prairie traveler.

The fun part is that I’ve been able to share that info and help people with setting up their tents, folding them and so on.

anyway, my goal, to finish by end of the year and with help is to take sections of this folder to create a book, targeted towards the civil war reenactor, to help them take their impressions to the next level.


January 1st 2018

last year, it seems I spent a lot of time playing with collodion and fighting to get it to stick to glass. This was a huge problem for me, hampering my ability work on Chasing O’Sullivan  or any of my other special projects.  However late in 2017 after talking to different people, asking questions, as well experimenting with different collodion formulas I was able to resolve the issue I was having with collodion sticking glass.

1-1-17

This Silver Gelatin print was done from an 8 x10 wet collodion negative, that I took on January 1st, 2018. I used my favorite formula of Old Workhorse Collodion. I simply cleaned the glass using rottenstone and alcohol, ensuring that the glass was squeaky when I ran the paper towels or finger across the edge.   I didn’t apply albumen to the glass.  This may sound silly, but most of the descriptions modern and historic about cleaning glass, talk about cleaning the glass using flannel, then holding the glass with silk, to obtain a static charge, or coating or edging the glass with albumen, while others, say clean it with rottenstone and alcohol, then washing the plate it warm soapy water.
then testing the glasses cleanliness by breathing on it, and watching how your breath clears. Nearly all of these different descriptions omit the squeaky part. Around the middle of last year, while talking to Dana Sullivan, We talked about Collodion formulas and albumenizing glass. and he said he cleaned his glass using the normal rottenstone and alcohol, then washed the plates with warm soapy water.  Then dried the plates using some alcohol, but also ensured they were squeaky, and that he had no problems. with the Collodion sticking to the glass. Well, after some time I was able to experiment with this, only I omitted washing the plate after cleaning with rottenstone and alcohol, but I ensured the glass was squeaky and dust free.  I then flowed my normal collodion.  using my Darlot wide angle lens, wide open I took the above photo.  again the lens was wide open, thus causing the vignetting, and I tilted my plate too soon, causing the collodion on the opposite side to run a little, but all-in-all for a 2-minute dusk exposure, I feel that it was a success. and aside from a tiny bit on the edges, the collodion is sticking. I also tried 2 two other plates for a photo I’m working on, that’ll show later once I’m done.

Other things: 

2017 brought a lot of change, the year seemed long and short. long because it seemed that working as a field engineer and struggling to pay bills, that I wasn’t moving forward.  it also seemed that I fought my collodion while twiddling my thumbs at some of the events and shows I did. people would say that’s amazing, and a photo is worth what I was asking but didn’t buy them.  This, however also brought some change trying to integrate new ideas, while being invited to do paid talks and demos for schools in the new year.

I also spent time effectively creating a new job, that Segways into my childhood dream of creating magic through miniatures, as professional special effects model builder. For someplace such as Industrial Light and Magic or Disney.  my background as an Artist and Electrical Engineer lead me down a path of installing advanced electronics into large-scale model trains, as well as designing and building new aspects while adding realism by weathering them.  you may read about some of those pursuits through my webpage and small business that I’m presently calling Silver State Models the URL is still using wordpress, rather than a full Domain. the URL is https://kristinesotherprojects.wordpress.com/

Presently  Silver State Models can be considered as a subdivision of Battle Born Historical Photography.

So, with that, for 2018, I’ll be consistently working on advancing Silver State Models, while introducing some exciting aspects to Battle Born Historical Photography, that’ll allow more people to experience time traveling to an when photography was considered magic

Happy New year from Battle Born Historical photography


Kearny Park 2017

This basically is our last major event of the year, 2 days of School days and 2 days of working. with the travel of about 6 drive, done the day before School days, and the day after.

it takes us about 3-4 hours to setup and teardown our camp.

over the two days, of school day presentations, the event hosted some 3500 students of classes ranging from 20-40 students & parents, with a 15-minute presentation.  during that time I came up with a nice patented presentation, that keeps the student’s attention while pouring them full of facts, about photography. along with some of the amazing things that were introduced with collodion photography.

I’m proud of myself, in that I was invited to give a paid presentation to a school in Fresno California, early next year.

This year, we were placed under some Monkey Puzzle trees, that dropped everything they could on our tents, requiring me to set up the tents, wash them and fold them back up before storing them for the winter. However, we were also placed in the corner of the Artisan and Civilian town, this allowed for greater visibility, and ended up keeping us so busy that, we never had a chance to leave and visit the rest of reenactment.

but, I was able to take some nice photo’s

IMG_4406.JPG

Then Finally, I have some new idea’s that I’m developing to offer as I hope low-cost alternative for students and hopefully everyone else to enjoy as a Battle Born Historical photography exclusive item. – that if the idea goes will be expanded upon.

Here’s a teaser hint, it’s something that many photographers worked on, something that many modern collodion photographers have thought of. it was something that was popularized during the Civil War, that I’m hoping to reintroduce.


Reno Cowboy-Con 2017

When I was 1st invited and heard about this event I wasn’t sure about it. Was it really going to happen?  Was I even going to attend this event? When I was originally invited, I said I couldn’t afford the booth fee’s and was then promised to be setup as an exhibitor, which was then left there without any further contact from the event coordinator.  if it hadn’t been for the efforts of the folks who coordinate Tanner’s antiques and craft show, who invited me in the end, and provided me space with basically the same deal that they’ve done for me at Tanners, I wouldn’t have attended, this too was basically however last minute.

needless say, I was able to pull things together at the last minute while recruiting my daughter to help.  I borrowed a wonderful 1870’s military saddle, some chaps, a couple of whips, some lasso rope, that in the end was unfortunately never used, if I use the saddle again, I would like to make a saddle stand for it. I also bought some other items, that I normally have available.

I’m pleased to state, that the majority of those who had a tintype taken where re-enactors, who kept me busy on Saturday.  and had it not been for them, I wouldn’t have been able to pay my booth fees, and other incidentals for an event that had little to no advertising and was held at the Reno-convention center who charges everyone $10.00 day for parking, plus extra for an extension cord plugged into the wall behind me.

on the upswing, while my lighting is adequate, I’ve decided for these events I would like to upgrade the lamp fixtures on my continuous lights and drop my strobes, hopefully bringing my exposures from 10 seconds and a strobe pop down to about 6 seconds without the strobe.

granted I did like having the curtains and the tables with their covers, and I think adding the borrowed wire grid work to display and try to sell some of my framed photo’s added to the overall look.

I am also pleased to state my chemicals and gear worked flawlessly the only retakes were ones where I didn’t get the lighting adjusted correctly which caused weird shadows.

20632584_10213629921333357_1136760480_n

This is one of my more favorite photo’s that I took of one of my fellow Comstock Civil War Reenactors, he portrays Allen Pinkerton.

It’s sad, the event has a lot of potential, however as a small antique dealer or a starving artist. The booth space, the incidentals, travel & room cost of the Reno convention center and the Alantas Casino/hotel has caused a great number of the vendors vowing that if the event occurs next year, they will not be attending. For me, the jury is still out. as to Tanners Antiques and crafts show. I’ll definitely be setting up there again.  Some of the framed photo’s will be traveling to a gallery in Carson City Nevada while the others will be returning to the Churchill County offices, and if the smoke ever clears enough to let me get out, I’ll be able to do some work on the O’Sullivan project. now that I have a better idea of the collodion recipe that O’Sullivan was likely using.


Because you know I’m all about that light! The Portable Dark Room

Working with a lot of the public at different events, with a focus on living history/reenacting. I’ve set myself up more as a 19th-century itinerant photographer.
As part of that I carry a lot of items, that are designed and built to be reasonably historically representative and functional.  My Darkbox or portable darkroom is no-exception.

H7Historically, there are many different designs to choose from as exemplified in catalogs, photographs and a small handful remaining of historic examples.

Unfortunately, I’m afraid that too many people have watched too much television, leading to the most common assumption that my darkbox is my camera, along with many other questions based upon myth created out of the silver screen.


My Darkbox is simply a wooden box, with a window and some tenting added, that provides a dark area, with limited light, that does not affect the collodion film. a safe-light. and while I have given my dark box a nice finish, which is very Victorian. these items were commercially available or were crafted for the photographer based upon their specifications.

When designing my darkbox, I looked at historical and modern examples. with the basic caveat that it needed to be light enough for me to move and setup by myself, it also needed to have enough working space for a 5×7 sized silver bath, plate holder, and trays.

fortunitly, it’s also big enouph that I can with some careful manipulations work with an 8×10, it is however a tight space. leading to eventually updated to something more portable. but with more space

Untitled-2.jpg34550_std.jpg


Not being terribly flush in money to invest in purchasing a crafted darkbox, with the stand and tenting. I opted to talk to a local woodworker to craft the box for me.  The basic design was is similar to some of the modern crafted darkboxes, in particular, Steves of Black art Woodcraft who makes wonderful period style cameras, and point of fact is the same person who originally crafted my camera.


blackarts.jpg
Black Art Woodcraft Darkbox and stand.

The following year of use I crafted the tripod stand. based upon plans from Ty Guillory for his platform tripod.  The tripod stand was a vast improvement making the whole thing more stable as well as being more historically correct.


darkbox tri-pod


I suppose, because I often set my darkbox up towards the front of the camp and that it’s on a tripod stand that this also adds to the confusion, but again people seemingly are fascinated by it, wanting to see the inside, take pictures of it, and so on. again to me it’s not particularly special, other than being finished box. that’s been stained a dark color, and painted yellow on the inside, it now proudly displays silver stains all over the inside.

the next question, why is it painted yellow inside. the answer is actually very simple, it’s a bright color that allows us to see more easily while tucked inside, plus collodion film is basically blind to color, again one of those safe colors. additionally, the majority of the wet-plate dark-boxes were also painted yellow on the inside

11070422_10206495643660874_3923187153167215529_o.jpg


Finally, I would eventually prefer a cart, allowing me more space along with the ability to be more mobile at events, and I just recently learned who designed and crafted this cart, that was sold to another wet-plate photographer located in the northwest. and have asked him for his basic designs. 10535714_711931188856886_46888564588958569_o.jpg


Period style Cameras

This posting is really meant as an addendum to my posting about our black arts Camera, which is designed based upon a common 1860’s era camera, the majority of the cameras looked very similar. Some of those cameras were a little more elaborate than others.

This is a slight challenge, based upon people’s perception from what they’ve seen in Hollywood, plus the overall age of the cameras. if the camera was a true wet-plate camera, that was heavily used its chances of survival for 150+ years are radically diminished, just from the silver eating away the wood.

this along with the sheer cost of an actual wet-plate camera causes a great number of modern wet-plate photographers to use 20th-century cameras with custom plate holders. or custom crafted cameras. additionally, most 1860’s era cameras are cumbersome, with limited movements.

recently, I found on eBay 1930’s – 1950’s era Agfa/Ansco with a customized wet-plate holder & back crafted by what looks like a star camera, the camera was also mounted with, what the seller is saying is a Darlot Petzval lens.

s-l1600.jpg

s-l1600 (1).jpg

let me state, while this is a nice camera. We have a couple of them, the camera is what’s called their Univeral model, and came in a few different sizes. We at present have a 4 x 5 and a 8 x 10.   It is long ways off from 1860’s period correct camera. To me, it would be like taking a World War II cannon to a civil war reenactment, then saying it was Civil War period cannon. There are so many things wrong that it sticks out like a sore thumb.

Yet, Sadly, the majority of people, including reenactors have no idea about the difference between a contemporary camera and an 1860’s era camera.

This was basically my choice something like the above camera, that I could have found on eBay anywhere from about $500.00 on up to about $2000.00, with the likelihood of requiring me to craft some sort of plate holder. and possibly recondition the camera.  a few years ago, I was offered one of these, with a custom plate holder, etc and I believe the seller wanted close to $2500.00

this particular camera is presently listed on eBay as a wet-plate camera with the seller asking a  buy-it-now price of 1,495.00 plus $100.00 shipping.

A period correct style camera typically have the same sized front standard as they do the rear standard, they are commonly fixed to a frame, that includes rails allowing the rear standard, which is the focal plane the ability to move back & forth allowing the photographer the ability to focus the camera. it’s very rare that they’ll have tilt & twist movements on the standards, they may have a rise and fall, or horizontal slide on the front lens board. The style is commonly called a tailboard camera.

To show, the radical cost difference, there is also an eBay listing for an 1860- 1870’s Ross wet-plate camera.  this camera is considered a tailboard camera, it uses wings to help stabilize the tailboard, allowing for more stability without having to use a sled or platform tripod. The buy it now price is  $6,550.00 +$131.00 shipping.


With the listing, the seller also includes some drawings from an 1870’s era magazine, of a photographer taking using a similar style camera.  I’ve used the same images for inspiration for my dark box.

bgrafic


As much as I would love to have and use the camera listed on eBay, It’s an out of our price range. However like before if you have such a camera that you would like to donate to us, please contact us, or perhaps donate the funds so that we can purchase the camera, please click on the donate button.

btn_donateCC_LG

here’s an interesting note on the horizontal slide setup of the front standards, one of the neat aspects of this, is that it allows the photographer to take stereo views with a single lens.

The Black Arts Camera

This is our primary Camera, it’s an early camera crafted by Stephen Silipigni of Black Art Woodcraft.  He calls this design the Ross 8 x 10 field camera. Today, Thousands of children and adults alike have looked through our camera, becoming one of the main attractions of our camp. It seems as if nearly everyone is astounded by the clarity of the lenses while questioning why the image is upside down.

20160902-img_1660

Unfortunately,  unannounced to us when we purchased the camera used.  We learned That it had, had a hard life. It was originally crafted for someone in Europe and was severely damaged in shipping, then cobbled back together by Steve to be used as a backup camera. It was never supposed to be resold.

When I started looking for a more period correct 8 x 10 camera, I basically had the choice of looking for an antique, with an average cost of about $2,000.00 while likely needing restoration. Or purchasing a new purpose built a camera for about the same price without restoration, I chose the latter option. This narrowed my choice between two different manufacturers, remembering I wanted a period style. leaving me to choose between a 8 x 10 crafted by Star Camera Company or an 8 x10 crafted by Black Art Woodcraft.  Out of the two cameras, I preferred the Black Art Woodcraft camera. However, the average turnaround to have one crafted by Black Art Woodcraft is 6 months to a year. At the time, We choose to purchase a used one, to reduce the overall cost and wait time.

Perhaps when my skills increase, and I start earning more money with the camera, I’ll have one crafted for me. The average cost of a modern crafted Ross 8 x 10 field camera is close to $2500.00.  I find it interesting, some of the collodionist who have been working the craft for a number of years will often end up with a camera crafted for them. Then, when articles are written about the photographer, Their primary camera often receives some notoriety. None of these cameras are mass produced and are traditionally produced for the photographer, or they are using an 1860’s era wet-plate camera.

We are always open to donations to help us purchase a new camera specifically built for me.

btn_donateCC_LG

While my camera wasn’t specifically crafted for me, and it does have some mechanical issues which Steve is willing to address. I’ve been quoted a price of nearly half the cost of what we paid for the camera, With the additional down time. At present time I have not made a plate holder or lens boards for my 8 x 10 film camera, so, basically, I would be hobbled, limiting my ability to work. Additionally, As we are on a shoestring budget I’ve chosen to work with a woodworker and machinist to craft new support structure for the camera box. Creating a new brass T-slot track, allowing me to lock the focus of the camera.  For the last couple of years I’ve been limping along using the camera, and unfortunately, it has accidentally been knocked over a couple of times.  Causing further damage, making it very difficult if not impossible to lock back standard in place holding my focus, for my most commonly used portrait lens. This last weekend, at Red Bluff Civil War days, really proved that point requiring someone to help hold the rear standard in place.

Additionally, I have encountered a few other issues, such as creating new lensboards and inserts for different sized plates. And then finally the occasional light leak, when locking the plate holder into the camera.

So, in short, by the time we are done, I’ll have a camera that’s been customized for me. with dreams of eventually ordering a new one, or learning the skills to craft my own.

as we work on the camera, I’ll update this posting.

Here are some different photos of the camera.


Conley

The Conley Camera Company of Rochester, Minnesota, was a little-known player in the arena of early 20th-Century photography. Selling their products mainly through the Sears catalog, Conley made cameras and photographic accessories from 1899 to 1927. The majority of their cameras were by no means high-end; Conley made inexpensive cameras for the masses. That does not mean that they were poorly-made–some Conley features were downright ingenious, and their hand-crafted mahogany, cherry, and nickel-plated cameras were things of beauty. Although they would never become serious competitors with industry giants such as Kodak, their influence was widespread thanks to their relationship with the Sears catalog. In the years before the Mayo Clinic’s rise to worldwide fame, the Conley Camera Co was arguably the most successful enterprise in Rochester, MN, up to that time.Conley

Today, very little is known about Conley cameras. Their camera models are often misidentified if they are identified at all. Many people who have one of their plate cameras think that they were made in 1907 because of the date on the front. That is, in fact, the patent date of the front standard locking mechanism and bears no relationship at all to the manufacturing date. Most of their cameras can be found here, cross-referenced among the various names they sometimes sold under. Not absolutely everything is included: for example, the 700-lb Queen City Specimen Camera No 42–only one of which is known for certain to have been made–is absent (though if I can locate it, I’ll include a photo) . But for the most part, if it could be purchased on the mass market, you’ll find it here. To my knowledge, this is the most comprehensive assembly of Conley products extant. No doubt, it will continue to grow as previously-unknown models come to light.

we originally found our Conley camera at an antique yard sale. I crafted a new lensboard, added a lens, and gave the camera complete tune-up, patching the bellows, cleaning and oiling the wood and metal.  My experience showed me that the Conley cameras are nice lightweight cameras, with several movements. I did take a few film photo’s using the camera

01

Here are some different photos of the camera.


Questions and Answers

Inevitably reenactors are regularly asked several questions, that we’ve heard over and over again, and invariably we joke about them. Some of the common questions I’ve been asked are, is that a real baby is that real food, do you really sleep here. The basic answer to all of those is yes.  One of my favorite stories, related to when I was in the 4-H and raised angora rabbits. My mother an educator and textile artist would pluck and spin yarn directly from the rabbit, this perfectly normal and doesn’t harm the rabbit. One year at the Northern California Renaissance Faire, she happened to be spinning from one the rabbits, and as a woman began calmly explaining to her son, that the woman spinning was pulling the wool out of the pile in her lap, at which point the rabbit grew tired of sitting and promptly almost as on cue hopped of my mother’s lap, nearly giving the woman a heart-attack. The point is that doing reenacting, or living history, is that we are often actually living as if we were in that time period, at least within reason. and it’s actually very easy, simply perform some mundane task, like washing clothes or cooking, only in a style that is period correct to the era you are reenacting. To do this we use items that are more often than not, reproductions, antiques or period items. This means the items are not Hollywood props or toys that were purchased at Walmart. They are real working items, such guns, or my cameras. We also often create our own items and clothing, if we do not have the skill or time, we purchase items from craftspeople who can.

Reenactors in general, do what we do out of a passion for history and educating people through creating impressions, of actual people or people who could have lived. The benefits that we get are the enjoyment of spending time with our families and friends, learning about the era as well as teaching people about what we’ve learned reenacting.

Reenacting is considered a hobby, with most of the clubs being non-profit organizations. Like any hobby or organization, there are different levels of commitment and involvement. Sometimes reenactors only come out during battles, while others, count the stitches in their clothing, trying to ensure that everything is as accurate as possible. That clothing is just that, we, however, call it garb so as to distinguish our clothing from cheap Halloween costumes. This is not a cheap hobby,  we as reenactors are not paid, we do this out of love.

With Battle Born Historical Photography, we are living history artisans. This means that when at an event, we live onsite at our camp. Everything in our camp is researched and documented for its authenticity as is practical.

Some of the questions we’ve been asked:

  • Are you a vendor?
    No, we are not vendors. We are living history artisans, using 19th-century photographic processes to take modern photos. They are not old-timey foto’s taken with a digital camera and printed out to look old. They are real tintypes or ambrotypes, taken using historic methods and equipment. We do however sell reproduction or antique cases and frames to accompany photo’s that we’ve taken, these are generally not sold separately.
  • Are you really taking pictures? 
    Yes, I am really taking pictures utilizing 19th-century processes and equipment. And as result due to the nature of the process, I am an artist.  it’s depended on a lot of different factors – I’m not taking “old-timey foto’s”.
  • Do you supply costumes?
    No, we do not supply costumes, sometimes the club can supply costumes, however, those are primarily for people interested in becoming involved in the hobby, you’ll need to make arrangements with the club about the use of appropriate garb.
    I’m taking a serious photograph utilizing 160-year-old process which has earned the respect as being the most archivable form of photography, with photographs having been processed both on glass and tin, still existing today, looking as they did when they were taken. Do you want to be remembered 100 years from now wearing a silly costume?  however, with that being said, I do have some props and you are more than welcome to bring your own attire.
  • Can you give me a discount because ________ ?
    No, utilizing this process is quite costly as is the investment both monetarily and in time. I can not just run to my local camera store and purchase items I need to take photos. If anything goes wrong with my equipment, chemicals or some major component is forgotten, I have figure out a solution to the problem or I can not take photos, I work at this year round, making things for the camp, practicing my skills and maintaining my equipment and chemicals.  The prices I list are beyond reasonable. – if you do not like my prices, you are more than welcome to shop elsewhere. I’m not a commercial Vendor, I’m an artist who practices 160-year-old photographic process to provide you with an actual tintype.
  •  That Camera is beautiful, does it still work?
    Yes, Why wouldn’t it still work? it’s a very simple device. it really is nothing more than a box with a lens, all of my lenses are minimal of 120 years old. they are true antiques, and difficult and costly to obtain.
  • Is that camera an antique?
    The answer really depends on the camera, the main camera I use is a modern crafted 8 x 10 based upon a common 1860’s view camera specific for wet-plate photography. The lenses, however, are all original 19th-century lenses.(see meet the lenses)  My small camera, as we call it is an 1880’s era Rochester Optical & Co. new improved model originally designed f dry plate or film. it’s simply a basic view camera, that was designed to be used as a wide angle single view or stereo view. I have modified the plate holders to work with the wet-plate process.
  • Did you make, or who made your camera?
    No, I didn’t make my camera. I do not have all the skills or experience to do so, I have however made several of items that we use in the camp and with the camera. My camera was purchased 3rd hand. It was originally crafted Stephen Silipigni of Black Art Woodcraft. Eventually, I will likely have Steve craft a camera for me.

    • update I’ve with some aid modified and changed the base board for my Black Art woodcraft camera
  • Is the camera for sale?
    No, I do however sell reconditioned antique cameras and/or can recondition a camera for you.
  • How much does a camera like that cost?
    Our Black Arts camera cost us $1500.00, today the camera is closer to $2000.00 – this was just for the box.
  • Where do you find such a camera or lenses?
    Commonly we find cameras and lenses through asking other wet-plate photographers. We often trade amongst ourselves, or other times, we simply find antiques at yard sales, antique stores or online through sites like eBay. Then we typically recondition and modify the camera’s to our needs. Most of my lenses are irreplaceable.
  • The chemicals are still available?
    Yes, the majority of them are commonly available. We typically purchase them from specialty suppliers of alternative photographic processes. While they are dangerous and can be considered lethal. The quantities that I work with are considered ORMD this basically means that they are no more dangerous than common household chemicals. however, as for safety, we keep a tight control on them. they often lock away when they are not in direct use.
  • Can you use my digital image to make a tintype?
    The basic answer is yes, however it is not practical or cost effective. It is at least 3 times the amount of work, with at least a month turn around. I need to charge at least 3 times the cost plus my Darkroom fees. Having me utilize the historical methods to take your photograph, so therefore, I generally will answer no. please see my basic price list
  • Do you sell any of your photographs?
    Yes, I sell framed originals, generally, I try to post images of originals on different social media sites such as facebook or Instagram, for prints of my digital photos along with a select few scans of tintypes you can visit my Zenfolio galleries.  http://kristine.zenfolio.com/  Please note I’m working on building a stock of photographs that I carry with me to different events and processed and framed photos will always be more expensive than digital photos.